What are Boosts?
Boosts are passive character traits that give bonuses to specific activities or rolls. They function similarly to an inborn talent or quality of the character. Think of them as your character's natural talents.
Boosts are always active and don't usually need to be triggered manually. Some boosts have percentage chances of being activated, while others have specific requirements for their effects to be applied. Not all boosts will benefit the character, nor will all boosts affect every roll. All boosts have both positive effects and drawbacks, making them useful for certain activities but not others. This variety allows for you to have different characters good at different activities or various roles.
How do I Obtain Boosts?
There are several ways for a spirit to get boosts:
- Creation: Boosts can randomly appear during geno creation (When getting a random geno from an event/activity or when summoning) or inherited from the summoners themselves during summoning. While boosts are rare to show up, the more common a boost is, the more likely to get it.
- Familiars & Equipment: Certain familiars and any enchanted equipment can grant boosts to your character, however, many familiars and even some equipment may have to be drawn to recieve the boost or benefit, and thus receive the benefits. These boosts are not on the character's geno however and cannot pass in summoning.
- Rebirth: While rebirthing usually only increases the tiers of existing boosts on a character, there are some boosts such as Effects, Resists, and Weaks that can add each other to the geno. Additionally, rebirthing has a chance to apply boosts added via familiar or equipment to the geno of your character. As with creation, the rarer a boost, the harder it is to increase the tier or get it on the geno.
- Skills or Certain Item Effects: Specific items, familiars (like the Slime Familiar), or skills can grant or modify boosts. Some skills increase boost effects or change boost-related processes entirely.
Removing Boosts
What if I Don't Want a Boost on my Character?
If you don't want a boost on your character or dislike a higher-tier boost's effects, you can use Debuffers to remove them. Debuffers only remove one tier at a time, so the higher the tier a boost is, the more debuffers you have to use to remove it completely.
Why Would I Want to Remove a Boost From my Character?
Some boosts have pretty nasty drawbacks. Depending on what kind of activity you're using your character in, certain boosts may hurt more than help. For example, you wouldn't want Sloth on a character you're going to be using in Cove, and Fisherman won't be very helpful in Dungeons. Secondarily, maybe you want the boost on the character, but you'd rather it be on equipment and not on the geno so you can remove it as you please, or prevent it from passing to summons. Whatever your reason, it is valid.
You can get Debuffers from Vault's Haven using Silver Coins. Silver Coins can be gotten in Krawft's Crafting in exchange for materials (requires Vault's Contract from her shop first).
Boost Strategies
Some boosts work well together, while others cancel each other out or work against each other. This intentional balance encourages specialization. Rather than aiming for a "jack-of-all-trades" character, players can strategically choose boosts that excel in specific areas. This allows for different builds and playstyles - there's no single "best" character build. While a character can possess a variety of boosts, they won't be as effective at everything as a character built for a specific role.
Planning your Builds
You might want to consider what boosts you want on the geno or not. Some will work on your Kiji or Tally's geno, some are meant for flexible use on equipment you can swap in and out so you can grant it to multiple characters as needed, and others are best at being part of your active Familiar roster, letting you choose when to use them. Additionally, some boosts are better on lower stated characters but are practically useless on higher statted or maxed out characters or vice versa.
The in-game Compendium serves as a valuable resource for understanding how Boosts interact. It can provide detailed information on each boost and possible interactions with others, as well as what familiars apply what to characters.
Effect Boosts: Status Effects, Resists, and Weaks:
Effect boosts include specific status effects, resistances, and weaknesses. While there are other boosts that can place status effects, they are not included as effect boosts. The Circle of Effects chart here shows the list and how these interact - each section represents a different status effect, with arrows pointing from each effect to what it's strong against.
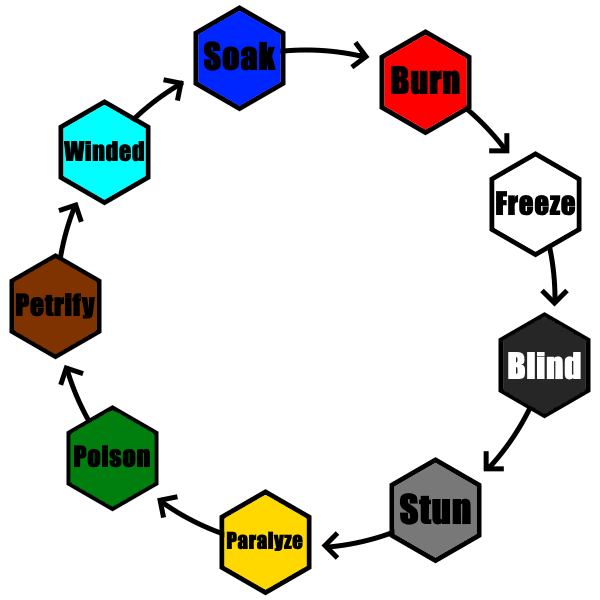
While seemingly detrimental, having a weakness to one effect increases your resistance to the effect it points to on the circle. For example, Weak Burn increases Resist Freeze effectiveness. This creates strategic trade-offs - you become more vulnerable to one effect but more resistant to another.
It's important to note that complete guaranteed resistance to all effects is practically impossible. Even with max tier resistances and weaknesses, you can only achieve a maximum 95% resistance chance to any effect (without skills or familiars).
Rebirthing can also grant new effect type boosts to your character or increase them (if possible). These added effects, resists, or weaks will always be adjacent (1-2 steps behind or after) to the existing effect, resist, or weak on the circle being effected by the rebirth, depending on which kind of effect they are.
Examples from the chart:
- Burn (red, top): Strong against Freeze, weak to Soak
- If you have Burning: rebirthing could add Weak Soak or Resist Freeze
- If you have Resist Burn: rebirth could add Soaked or Weak Winded
- If you have Weak Burn: rebirth could add Freezing or Resist Blinding
Additionally, if you have a max tier Resist, it has a chance of freely REMOVING the same type of weakness from your character. For example, if you have both Weak Petrify and max tier Resist Petrify, the resist could remove the weakness.
Lastly, Effect boosts are the only boosts that can stack in tier during summoning. If multiple parents pass the same effect boost, the summon will start off with a higher tier.
Advanced Boost Management and Tips
Character specialization: Focus on boosts that support your character's intended role rather than trying to cover all activities. A specialized character will outperform a generalist in their area of expertise.
Equipment flexibility: Consider putting situational boosts on equipment or use active familiars rather than having them the geno. This lets you adapt the same character to different activities by swapping gear or deciding whether or not to draw the familiar.
Summoning considerations: Remember that only geno boosts pass to offspring during summoning. Plan your summons with boost inheritance in mind.
Activity matching: Match your character's boosts to their intended activities. Research which boosts help or hinder specific content before committing to a build.
Resource management: Debuffers cost Silver Coins, so plan boost changes carefully. It's sometimes more efficient to build a new character than extensively modify an existing one.
Royally screwed up your character?
If you are unhappy with the boosts and/or skills on a character or messed up their stats, you can buy an amnesia tonic to reset everything and start from scratch. This is irreverable, and wipes almost everything! Familiars and equipment are returned to your inventory, and the only thing left untouched is the base stats, the design and traits, and the summons, as well as a small handful of titles and honors related to them. Boosts return to their earliest itteration according to their history.