Welcome to the World of Gaia!
We're happy to have you here! We know joining a new game can be a bit daunting sometimes, so we've put this guide together to help you along. If you find you need further assistance or a question you have isn't addressed here, feel free to join our Discord, or you can also check out the Searchable FAQ!
Here you will find instructions for joining the site, getting your first geno, and how to submit things to queues and design approvals, as well as how to contact an admin. To find more info and guides on the various activities and information, feel free to visit the Main Resource Hub located under Resources > Guides.
For Beginners
Making an Account
In order to make a Gaia's World account, you need to have a verification code. Verification codes were implemented to help prevent bots from joining. You can acquire a code by speaking to any member or admin, or by joining our Discord server, where codes are publicly posted. Mind that you have to be 13 or older to participate in anything in the group. If you're younger, the site will restrict your access to most features.
Don't forget to select a user on the site if you were referred by them!
Once your account is created, you need to verify BOTH your email and your account in order to engage in unrestricted site activities. For verifying your email, the email you used to sign up should have an email from the group with a link to verify it. This email could be in your Spam or Trash, so make sure to check there as well! If you cannot find your email to verify it, send us a message on the Discord and we can help you out.
For verifying your account, you have to have either a deviantArt and/or Toyhouse account. This is simply how our website handles account validation.
Signing up to deviantArt is free. You must be 13 years or older to legally join. https://www.deviantart.com/
The same goes for Toyhouse. https://toyhou.se/
If you don't have a Toyhouse account, you will first need to acquire an invite code. There are members on our Discord who will be happy to provide one if you need!
Acquiring Your First Spirits
To get your first characters, we recommend you first take a look at the available genos and imports in the Adoption Center. Genos can be perused here, while predesigned imports can be found here. You are allowed to choose one free Kijikaiaku (Kiji) and one free Subtalleon (Tally).
We understand that there are a lot of traits to choose between for genos, and it can be overwhelming for new players. Thus we greatly recommend looking over our visual trait indexes, which can be found under Recources > Compendium, then after clicking on it under Traits > Trait Indexes and either clicking on Kiji Trait Index or Tally Trait Index. You can also click on any trait on a geno and it will bring you to the trait page with the image and information. If you need help deciding or finding anything specific, the other players in our Discord would be happy to help find genos for you!
Once you've decided, please submit to the Adopt or Release a Geno prompt, and link both the genos you'd like in the comment. If you're only choosing one geno, you can put its link in the URL field. You also are not required to choose both at once; you may choose one geno now, and the other at a later date if desired.
Alternatively, if nothing appeals to you, or you feel too overwhelmed by the options, you may still submit to the Adopt or Release a Geno prompt and ask for one of each species to be rolled randomly for you. Also, you're not required to own both species, in case one species doesn't appeal to you for any reason. Even so, you can't replace the unwanted species with a second geno of the preferred species.
If it turns out the geno you acquired through adoption or random rolling is too complex for you to work with during the design stage, or it's not what you thought it would be, you have the option within the first four weeks of ownership of exchanging the geno for a new one from the Adoption Center. However, you can only do this once for each geno gained through these means.
Additionally, you can only adopt from the Adoption Center if: (1) You don't currently own that species, OR (2) You haven't owned that species in over a year. If someone gifted you a geno or import when you joined, or you bought and designed a design transfer or custom, and you haven't adopted already, then you may not adopt from the Adoption Center without using Adoption Papers. We will get more into Adoption Papers later in this guide on how to get more characters.
In the future, this same prompt can be used if you wish to surrender a geno for any reason in return for a specified amount of PT. You can access this prompt at any time from the top navbar by clicking on Resources > Adopt or Release a Geno.
Claiming Your Free Starter Items
The group offers all players a handful of free items that you can claim at any time. These items can be acquired from Gaia's Giveaways, which can always be found under World > Shops from the navbar. Note there are separate clickable category tabs under the shop image for all the items you can get, so make sure to look through these! Also be aware that you can claim more than one of some items.
There are some items in Gaia's Giveaways that can be picked up more than just the once, such as Daily Gifts and Adoption Papers, which you can get once per day and once per calendar month respectively. Additionally, there are some holiday items that will occasionally pop up, such as once-a-year April Fool's traits, so be sure to check by during these limited times for special items! We will always announce when new items are available for a limited time. Be sure to join our Discord for timely updates and announcements!
What Do I Do With My Items?
Depending on the category, some items are useful in crafting, and others are useful in certain activities or for designing your spirit. Some, like the Daily Gift and Trait Bundle, can be opened from your Public Inventory page, and these will drop more goodies! You can reach your Public Inventory by going to Home > Public Inventory from the navbar.
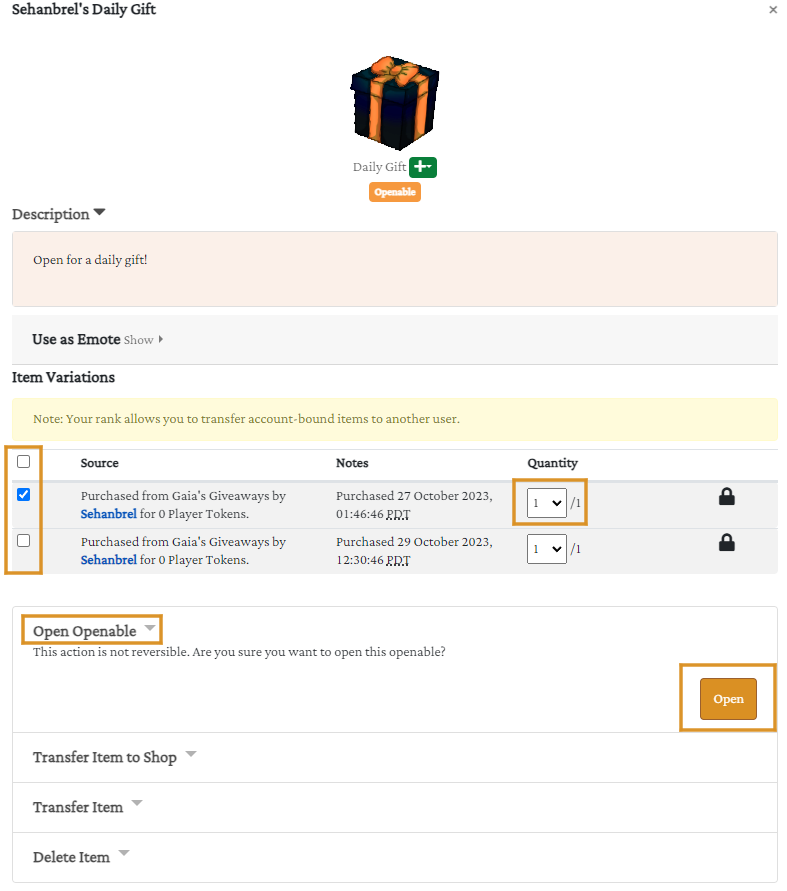
To open anything categorized under "Openables," click on the item, give it a moment to load (we have a lot of items in the game and sometimes inventory takes a moment to fully load), then check the box next to the instance and choose the quantity you want to open from the dropdown, and then click on Open at the bottom of the menu. The page will refresh, and notifications at the top will display whatever you gained.
While in Gaia's Giveaways, you might have noticed the Slime Border item. This is an avatar border, which you can purchase and apply to your avatar through your user Settings page. This is the only item in Gaia's Giveaways that costs something.
To buy this border from the shop, which will unlock it for your account, you first need to open your Daily Gift, which will drop 1 Gummies currency guaranteed. Once you have the Gummies, you can buy the border. Since this border counts as an Openable, you'll need to go back to your inventory page and open it just like the Daily Gift. After that, you can apply it to your avatar!
At your Settings page, you will also see a number of other free borders available. There are more than this available on site, which you can unlock later by completing various things. You can also unlock the Discord Border just by joining the Doscord! If an admin doesn't give you the border right away, feel free to shoot us a message or submit a claim.
Donation Shop
While on the Shops page, you might have also noticed the Donation Shop. This is where players sometimes freely donate unwanted items to. Here, you may go through the tabs of items and choose one item to acquire once every 24 hour period. The 24 hour countdown is displayed on the page, so you can always see how much time remains before you can claim again.
Designing Your New Spirit
Be sure to visit the Markings and Energy Guide for design rules!
Navigate to your “My Geno Slots” page, found on the navbar under Home > Characters > My Geno Slots or from your profile under User > Characters > Geno Slots. Click on the relevant geno you’ve designed. In the sidebar where it says Settings, click on Submit Geno Design, and then at the new page, click on Create Request.
Follow the instructions given on each tab of the page. You must click submit on each tab, even if there are no changes to that section.
Comments
The comments is a place where you can provide additional information to the admin about the submission, things they might miss, or things you're unsure of, or even just clarifying a decision on certain design elements. We recommend copying and pasting this optional form in the comments and filling it out when you submit, if anything is even applicable:
Name of Character (Optional; the admin approving can name it for you): N/A
Any Markings hidden under others?: N/A
Any Marking Interactions going on?: N/A
Any items being applied? What are they affecting?: N/A
Any additional images to help the approval admin? Do you want them added to the character's page?: N/A
If this is an import update, what is the reason for updating?: (Base transfer, applying/changing traits, Full redesign, submitting an additional image, etc)
If this is an MYO or Semicustom, what is the full geno and breakdown of limits?: N/A
Masterlist Image
When submitting the Masterlist Image, make sure that you crop close to your character’s face, but not too close that things get cut off. We should not be able to see the character's shoulders or more background than character. Do not toggle off the cropping tool. Also be sure the main file is under 2 megabytes (mb) / 2,000 kilobytes (kb). Generally, it’s best to resize your import’s PNG file to 1200 pixels wide at the highest. This ensures import size consistency and that even the most detail-heavy imports can be uploaded without issue.
If you must have larger images for details, you’re welcome to later link an additional gallery in the character’s profile. You may also later upload closeup images of important features, or ask an admin to do so, as additional legal references for your character.
Add-Ons
If you have items you are applying to the design, you can attach them in the add-ons. This includes Trait Applicators or Specialty Items. Consumables-Characters can be applied to a character after approval.
Please note there is a limit on the number of items you can apply to a character:
- Trait Edits, White Outs, Reality Essence, and Chimera Scrolls are limited to 5 max each on a character. Using a Trait Edit to REMOVE markings, mutations, or added traits is free and does not take up a slot.
- Trait Applicators are limited to a max of 8 on a single character. Instead of being tracked in the inventory like the above, they are tracked in the traits section in the character information, and will say 'Item Added'.
- Legacy is also tracked in the inventory. When using Legacy, we require you to submit an image of the character using the base as well, either alongside the Legacy or beforehand, for judging purposes. If submitting it alongside the Legacy, Glam Kits are wavered. You can only use 1 Legacy per character, unless they are Spliced in which they can have 2.
- Glam Kits and Perma Glams are tracked in inventories with notes on what they are affecting. They have no limits.
- Debuffers have no limits on their uses.
These limits do not change if the character is Spliced or has Duality. There is no limit on the number of items you can apply at once during approval besides their own individual limits.
Don't worry too much about these limits when submitting your first design! Most new players won't hit these caps. These are here for reference as you continue playing.
Traits
Please make sure to include the Build in the Subtype! Subtype 2 should be left blank. Transformation should only be selected if you are uploading the image as an alternate ref.
If you are adding a trait using a Trait Applicator, we ask you add said trait(s) to the Traits Tab with 'Item Added' (without quotes or parenthesis) in the Extra Info. This is optional, if you do not the approval admin will do it instead.
Please also be sure to include the Age Group, Height Class, and Mass Class in the traits when submitting to approvals! You get to choose whichever of the two classes, but the age group cannot be older than the summoners. If you submit a design for approval without all three of those, it will be cancelled and returned to draft status for you to add them.
Now What?
Designs are usually looked at within a couple days of submission, though more complex ones can take longer. If needing corrections, the approval admin will let you know in the comments and cancel the submission, returning it to a draft. It is rare we reject a submission outright. If your design is legal, we will approve it and get it set up with any needed changes, extra images, starting reputation, and anything else needed!
Once approved, visit your character's import page. If you haven't named them yet, click 'Profile' (top left), then 'Edit' (bottom right). You may name your character anything you like, but please keep it PG-13 and non-offensive. Here, you may also adjust Gift Art and Writing settings. [pictures pending]
If you have multiple characters that have been approved, the easiest way to access them all is from the Home > My Characters dropdown. From there, you can select any of your characters, as well as create and edit folders which you can add them to and organize them in whatever order you please. Your first 4 characters on this list will appear on your public profile.
Otherwise now you're free to participate in the group, get more characters, or just hoard or lurk if that's what you'd prefer.
Character Page Guide
If you want to look over your character and their information or edit things, you can go to your character's page by clicking on them from your profile, the home page, or the masterlist. On the lefthand panel of the import page you'll see many links. There are a few important ones to note...
Information
The information tab has the import itself, as well as other important information. At the top of the info, it has their name and ID on the left, and on the right is their profile if linked (while you can link anything here, we highly encourage only Toyhouse profiles be linked). It also has their Relationship Links, Gift Art/Writing, and Sale/Trade availability.
Below that, the character's alternate reference images if available, or that of any attached custom familiar. You can click each tab to view the images. By default, the main import image will be shown. If there are no alternate references, only the main import will be shown, with no tab bar visible.
Below the import image is a list of their genes and any added traits, all of which are linked with their description pages. You can also tab through the Notes and Credits if you're curious. Notes will have any extra information about the import, or, if the import is disabled, will have the reason.
If you scroll to the bottom there's a tabbed section with Description, Lineage, and Terms.
The Description tab has the character's geno (without added traits) as well as their stats and equipment slots. It also has information such as dungeon progress, den alleigiance, and cooldowns for summoning and rebirthing. This is so you can track your character's progress at a glance, and don't need to maintain a separate offsite tracker.
The Lineage tab has their summoners and their grandsummoners if available. Randomly rolled characters will not have a lineage. You may notice the Lineage looks a little odd; this is because a summoning can be performed by a max of 5 spirits.
The Terms tab has the terms placed by the person who designed the import. These terms cannot be altered by the person who owns the import, only the person who designed it.
Profile
The profile tab also has the main import, however will not have the alternate image tabs. It will also have the profile blurb textbox, and a link to edit it. You can change the character's name (but not their ID) to whatever you want, as often as you want. When editing, you can also set trade and gift status, relationship linking availablility, and attach a profile link (a Toyhouse is recommended). We ask the content posed here remain civil and adhere to group rules, but can be anything from character permissions, lore/backstory or personality, simple notes about the character, or even url links.
We strongly encourage naming your imports as soon as possible, as names make it easier for admins to locate them and add them to any summoning lineages.
Please be mindful that we reserve the right to alter your character's information without warning if it contains inappopriate content. Keep things civil and PG-13.
Links
This is a place to provide easy access to connecting certain characters together, whether it be for lore purposes or otherwise. This is mostly so you can access said characters without having to hunt them down. To link a character to another, head to the character you want to link to (if it's another user's character you'll have to go to their page), and if Links are allowed, you can click Request Link on the top right. You will need the character code to link the two characters (the PS-0000 or the PK-0000). You can link multiple characters of yours to the character. If you own both characters, it will auto link, if you do not, you must wait for the other user to accept your link.
Once the link is accepted, you will be able to set the relationship type, and add a small blurb about their relationship with the other character, which is of course optional.
Gallery
The Gallery is the place where you can find all images and literature that has been posted on the site including the character. The submissions will say who did them, as well as what gallery they are submitted for. If you click on an image, you can also see the prompt submissions (if approved/rolled) the image was submitted for, and the rewards accociated. If there are no prompt submissions linked, it either hasn't been rolled or wasn't submitted for rewards.
Inventory/Bank
Here you'll find any titles/honors the character possesses, their modifications, attached familiars, unlocked backgrounds, and current reputation, dungeon gold, and the summoning/rebirthing tracking. In the inventory you can click on any item to see what they do. Equipment and Familiars can be named. The only currency you'll see in the bank to start is reputation, which shows your current reputation with our factions.
Lineage
Unlike the lineage tab at the bottom of the information page, the lineage on the side bar shows the character's summons (children) and grandsummons (grandchildren), if they've ever summoned.
History>Images
This shows official images or ref of the character, whether it's close-ups of certain traits or familiar designs or their equipment. It also shows unofficial import images of past designs.
Ownership History
This is where you can go to see when the geno was initially greated, past owners, and when its design was approved. It also saves timestamps of any updates to the design approved through design updates.
Level Area
This is where you can find the current level your character is and how much exp they need to reach the next level.
Transfer
This allows you to transfer the character to another player. The other player will have to accept the transfer before it will process, however it's the quickest way to send it to another. You will have to also submit a reason for the transfer, though this can be as simple as just saying 'Gift'. If there are terms or you are trading for items, we recommend using the User Exchange instead.
Item Management
Shops can be accessed any time from the World dropdown menu on the navbar.
Selling Items
If you'd like to sell an item, there's no need to go to a shop page. Just head to your Public Inventory, click on any item, and if it can be sold, there'll be an option to do so.
Click the checkbox on the item you want to sell, select the quantity, click on Sell, and you're done!
Wishlists
If you see a lot of items you want, but can't yet acquire, you may find it prudent to create and maintain a Wishlist. This page can be found easily from the Home > Wishlists dropdown in the navbar. [info tba]
Crafting & Collections
Crafting offers a lot of useful things. In order to craft, simply go to the Activities menu in the navbar, and click on Krawft's Crafting. You'll see a bunch of recipes by default. So long as you have the items required, you can make any of the items you see here. All items in a given recipe are consumed upon crafting, and you also won't be permitted to craft if you lack any of the asked-for items.
You might have noticed as well before reading this guide, that there's additional recipes you can unlock, and there's also limited-time event recipes where you're able to exchange one type of currency for another. To unlock extra recipes, there's associated prompts, so be sure to read through all the available prompts if you're seeking something specific. If you want to create Twin Core Souls or restore Relics of the Past, for example, you need to do their prompts.
Currencies
There's a handful of currencies on site you may want to familiarize yourself with. [info tba]
About Centaurians and Affiliates
Centaurians are an open species created and owned by Wolvenhyde, and are an extra addition on the site. These, as well as other affiliates, can offer bonuses if drawn with your spirit characters. On their own, Centaurians have nothing to do with Gaia's World, so you can draw them in any setting of your choosing.
You can adopt a Centaurian geno the same way you can a spirit. However, unlike spirits, you can adopt a new Centaurian from the Adoption Center twice each month. Be sure to also check the Donation Center!
If desired, you can also buy a Custom Centaurian slot from the Credits Shop.
Centaurians are also a mammallian species and do not summon, but rather breed as normal. To breed centaurians and get a new geno, submit an Admin Request, and attach one male and one female centaurian, or 1-2 hermaphrodite centuarians, depending on the biological sex of the other partner. No extra items are needed.
Not being a full ARPG species, Centaurians are unable to offer much besides EXP or PT bonuses to spirits they're drawn with, and they're unable to rebirth or participate in most game mechanics. They do, however, have their own general art prompt, which can net you PT but no EXP. Centaurians also do not level up, nor can they equip items or familiars.
Other than the above, Centuarians do not have a canon lore, and you're welcome to play them however and wherever you wish!